
5 Easy Photography Hacks to Level Up Your Adventure Shots (With Just Your Phone)
Capturing the perfect shot on your phone while on an adventure is a game-changer. But it’s not about having the fanciest gear or spending hours editing. With a few key tips and some simple science, you can dramatically improve your photos—no fancy equipment required.
Whether you’re exploring the outdoors, attending a festival, or simply road tripping, here are five phone photography hacks to make your shots pop and elevate your travel memories. Let’s dive in:
HACK # 1: sHOOT dURING THE Golden Hour – The Secret Time for Stunning Shots
You’ve probably heard the term “Golden Hour” before, but do you know why it’s the best time for photos? It’s all about the angle and warmth of the light.
The Science:
The sun’s rays are softer and warmer during the Golden Hour (just after sunrise and before sunset). At this time, the light has to travel through more of the Earth’s atmosphere, scattering shorter wavelengths (like blue) and leaving longer, warmer wavelengths (like red and orange) to reach your camera. This creates those rich, golden tones in your shots, which makes landscapes, portraits, and everything in between look magical.
Why it Works:
Landscape: Golden Hour light softens the shadows, reducing harsh contrasts and bringing out the details in the sky, mountains, and water.
Portraits: The soft, diffused light helps reduce blemishes and gives your subject a natural glow, making it the perfect light for close-up shots of people and animals.
Pro Tip:
If you’re shooting landscapes, try to arrive a little earlier to catch the first rays of light. The moment right before sunrise or after sunset often holds the richest colors. For portraits, focus on the “soft light” 30 minutes after sunrise or before sunset for that gentle, flattering glow.

The color temperature of daylight varies with the time of day. It tends to be around 2,000 K shortly after sunrise or before sunset, around 3,500 K during "golden hour", and around 5,500 K at midday. The color temperature can also change significantly with altitude, latitude, season, and weather conditions.
Source: Wikipedia “Golden Hour” Photography

HACK # 2: Change Your Angle – Get Low for a New Perspective
Tired of shooting everything from eye level? Let’s get creative. One of the easiest ways to add drama to your photos is by changing your angle.
The Science:
When you shoot from a higher angle (looking down), you diminish depth and perspective. On the other hand, shooting from a low angle (looking up) naturally increases the feeling of grandeur, power, and excitement. This works wonders for landscapes, people, and wildlife!
Why it Works:
Landscapes: Getting low to the ground helps exaggerate the scale of the scene. It can bring interesting foreground elements (like rocks, plants, or water) into the shot and create more depth.
People & Animals: Shooting from a lower angle makes your subject appear more dynamic. In portraits, this can convey a sense of strength or grandeur.
Pro Tip:
Flip your phone upside-down and hold it on or near the ground. This adds depth and makes your subjects feel more engaging. It’s a small effort with huge payoff!

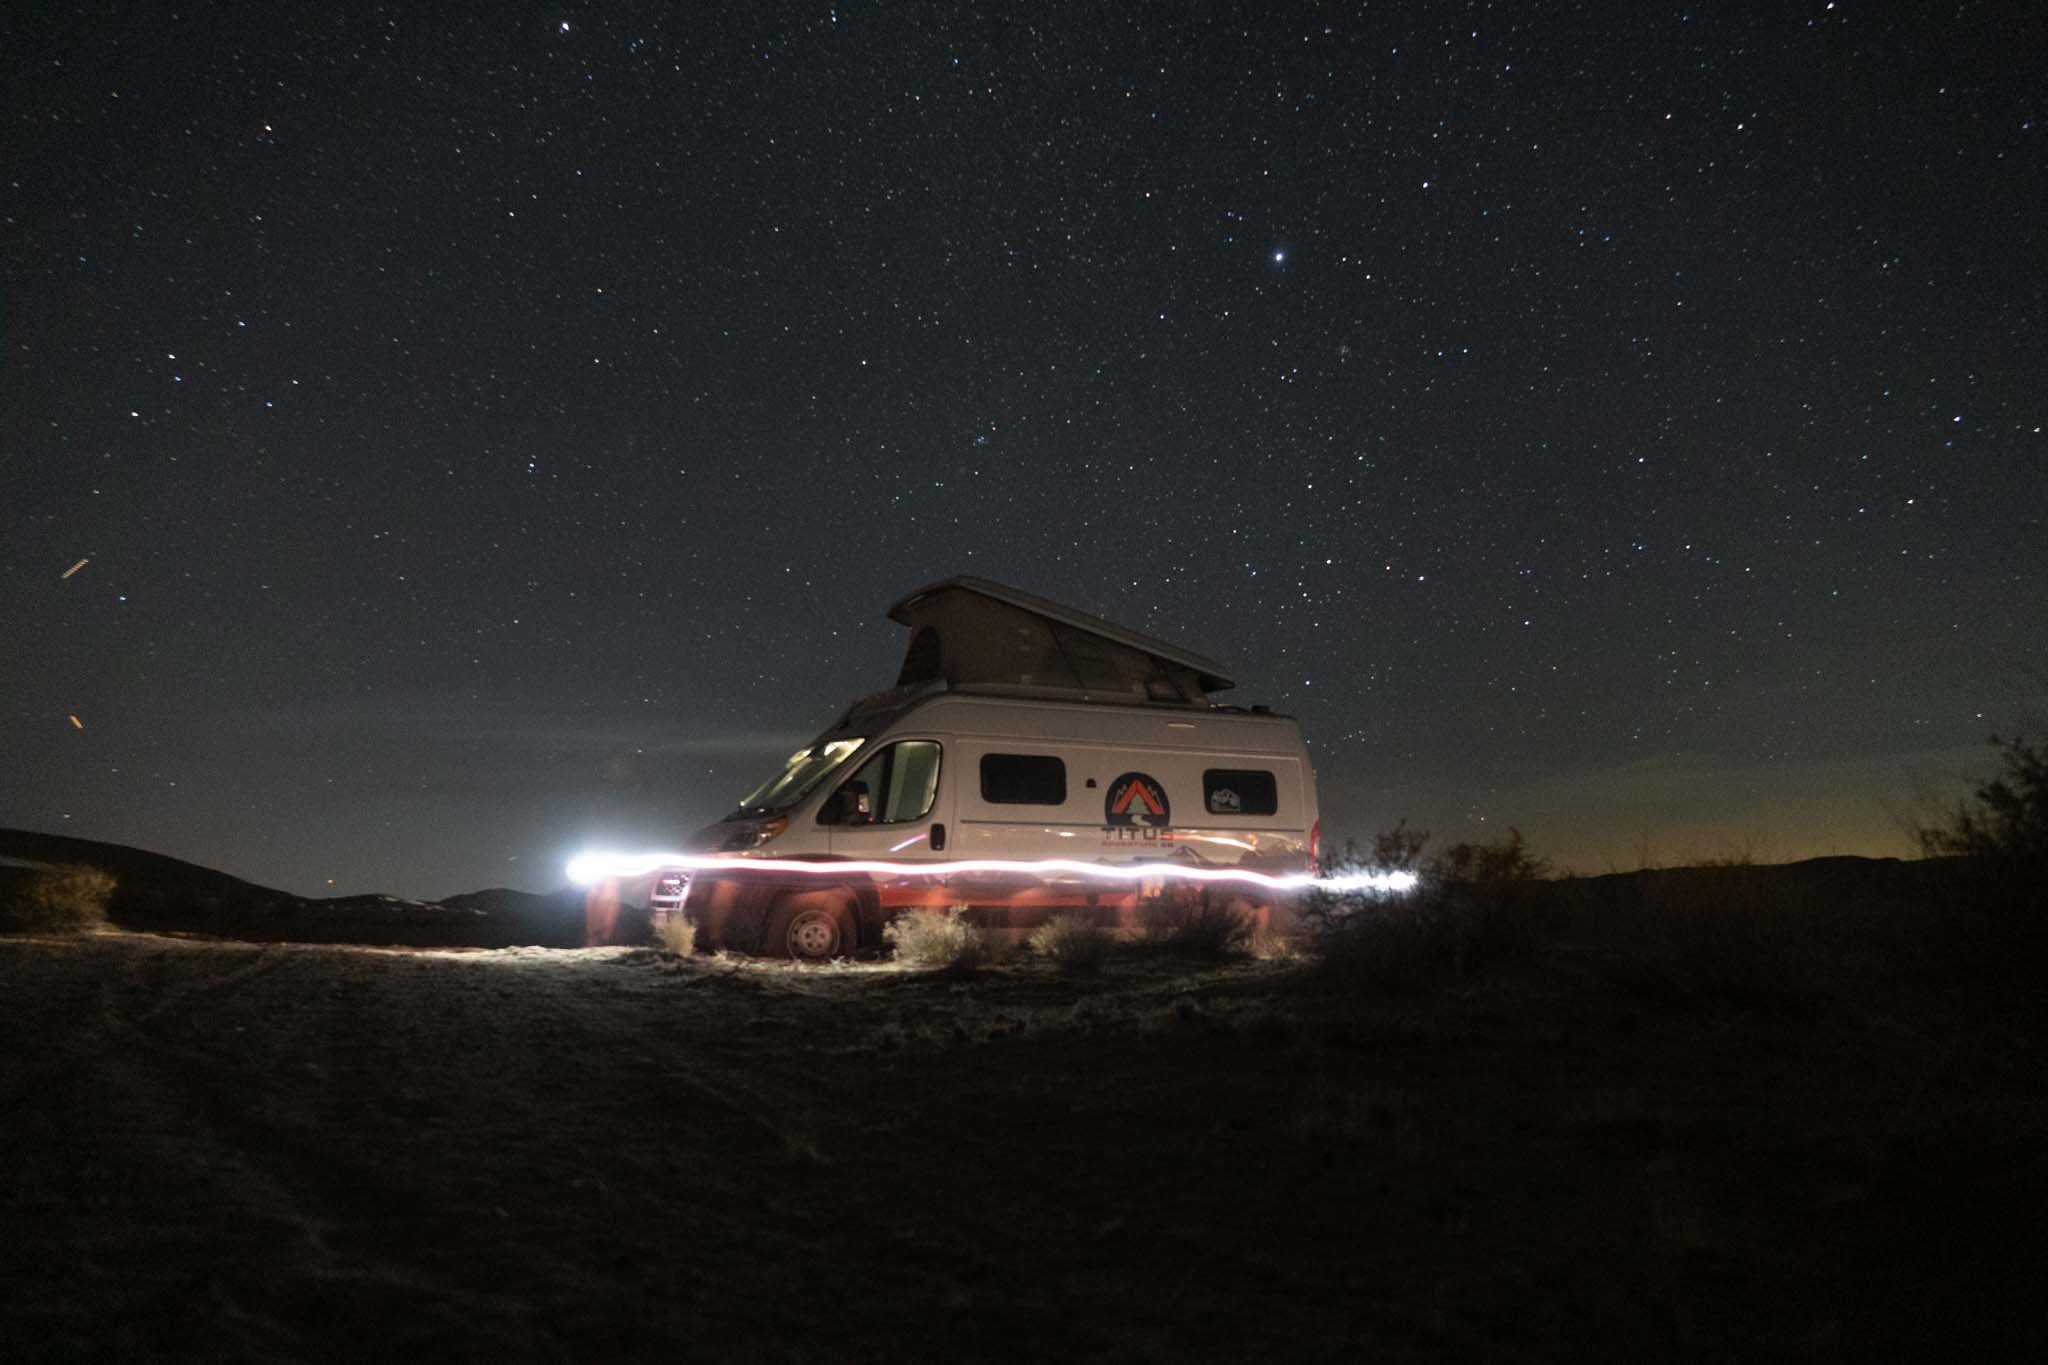
HACK # 3: Tripod? Nope – How to Stabilize Your Phone for Perfect Low-Light Shots
Night photography or shots in low light can be tricky, especially when your phone camera is shaky. But who says you need a tripod? You just need a couple of clever tricks.
The Science:
When you take photos in low light, your camera needs to keep the shutter open longer to capture more light. The longer it stays open, the more susceptible it is to blurriness from even the smallest movements. However, if you keep your phone still, even without a tripod, you can prevent this.
Why it Works:
Using a stable surface (like a rock, railing, or even a tree) helps keep your phone from shaking. Modern phone cameras (like the ones in the latest iPhones and Androids) also use Optical Image Stabilization (OIS), which compensates for small movements during longer exposures.
Pro Tip:
When shooting at night, use your phone’s “night mode” (available in many smartphones) to allow more light into the sensor without adding blur. For extra sharpness, prop your phone up on something solid to keep it steady. If you’re feeling adventurous, try “light painting” by moving a flashlight in the dark while capturing the movement—this is a fun way to add some creativity to your nighttime shots!
HACK # 4: Simplicity – Less is More in Every Shot
Ever feel like your photos are just too much? It’s easy to get carried away by every detail in front of you, but sometimes, less is more.
The Science:
Humans naturally gravitate toward simplicity because it allows our brains to process the image without distractions. Studies in design and art show that simplicity leads to greater emotional impact and a more pleasant viewing experience.
Why it Works:
By removing unnecessary elements, you allow your main subject to shine. If there’s too much clutter in the background (like power lines, trash, or crowded elements), it pulls attention away from what you’re trying to highlight. Simple, clean backgrounds keep your viewer’s focus on the most important parts of your photo.
Pro Tip:
Use an editing tool like Canva to easily remove any distractions that landed in your composition. Even simple clean-ups can make a huge difference in your final image:


HACK # 5: Balance – The Secret to a Visually Pleasing Shot
Balance isn’t just about making sure your subject is in the middle of the frame. It’s about giving each element in your photo a “visual weight” that feels right.
The Science:
Our brains naturally seek balance when viewing an image. A photograph with an off-balance composition can feel disorienting or unpleasing to look at. When you carefully balance your subject with the surrounding elements, it creates harmony and draws the viewer’s eye across the photo.
Why it Works:
By understanding “visual weight” (how much attention an element commands in the photo), you can position elements in a way that feels balanced. A large subject on one side can be balanced by smaller elements on the opposite side of the frame, keeping the photo visually engaging without feeling heavy on one side.
Pro Tip:
Try the “rule of thirds”—imagine dividing your photo into a 3x3 grid, and place important elements along those lines or at the intersections. This is a classic technique for creating well-balanced photos that are pleasing to the eye. Use object in foreground to direct focus and draw the viewer into your adventure.

Snap the Adventure, Share the Story
Photography is more than just capturing a moment; it’s about telling a story. Whether you’re snapping shots of the golden sunset or capturing the epic feeling of a road trip, these simple tips will help you take your photos to the next level. Remember, the best camera is the one you have with you—your phone. So get out there, try these hacks, and start telling your adventure stories through your lens.
Pro Tip for the Road:
Share your photos with us at Titus Adventures by tagging us in your shots! You never know, your photo might just inspire the next big adventure!